Everyone who knows me knows that I like custom keyboards. I’ve been using a Moonlander for quite some time now. People have wondered why and even questioned my sanity. But it’s more than a hobby. I mainly use customizable keyboards because I can reduce the amount of keyboard gymnastics I need to participate in by rebinding often-used key combinations.
In this post, we’ll discuss my current keyboard adventure. I’m switching layouts from Qwerty to Colemak. This should give me another layer of comfort on top of the key binds I’m already using.
Let me explain why I think a move makes sense to me.
Why learn Colemak?
Qwerty was designed to slow down typing because typewriters jammed frequently as typing speeds increased. But since we live in modern times, we no longer need to think about that. We can pick other layouts that are more suitable for modern times.
These days, there are a lot more layouts to choose from. For example, you can use Workman, Dvorak, and Colemak.
The inventor of Colemak wanted a layout that emphasized the use of the home row for most used letters in the English alphabet. 74% of the most used keys are on the home row. By moving the most critical keys to the home row, you should be a lot faster. I don’t think you’re going to be a lot faster. Instead, you’ll find more comfort because many keys require less travel of your fingers on the keyboard.
Is it easy to switch?
It’s not easy to switch between keyboard layouts, especially if you’re a blind typer. I’m super fast with Qwerty, so switching initially felt like torture. However, I’m already feeling much better after a few hours of typing only 30 words a minute. My typing speed is going back up quite quickly. And I have to reach less than with my previous layout.
Before reading the next section it’s good to understand that it’s going to take a while to switch from Qwerty to Colemak. And not all software will like you.
Making the switch in 5 steps
I have to be honest here. I’m not fully converted yet. I’m making a gradual move to Colemak. I started by following the Tarmak layout first. This layout allows you to convert in 5 steps. You can go cold turkey, but it’s a lot harder still.
The Tarmak layout has 4 phases that involve moving keys on your keyboard.
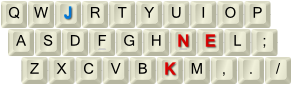
You start by moving 4 keys to different spots on the keyboard. In the first phase, you’ll move the keys J, N, E, and K to different locations. Notice that the N, and E keys are in their final spots with this move. The other keys will have to move again.
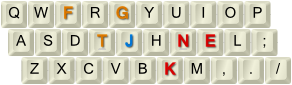
After you feel comfortable, you can move on to the next phase, moving another 4 keys. We’re moving the keys J, G, T, and F in this phase. The keys F, G, and T remain in place after this phase.
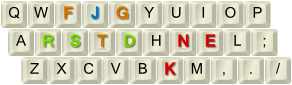
Make sure to get comfortable again in this phase to move on to the next phase without losing much speed. In the next phase, we’re moving the keys J, R, S, T, and D. This completes the most significant moves on the keyboard.
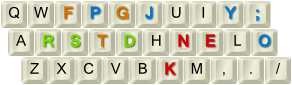
As before, make a few typing hours before making the final changes. In the final phase, you’ll transition into full Colemak.
As I mentioned at the start of this section, I haven’t completed all the phases. But even though I haven’t completed all the steps, I already learned about a few important things you should know before you start.
Important things to know before you start
Here are a few important things you should know before you start.
Get a programmable keyboard
The Tarmak layout is not supported in Windows, Linux or Mac. You’ll have to remap the keys in the firmware of your keyboard. I use a Moonlander that’s based on the QMK firmware which allows you to remap all the keys. There are a lot of keyboards that use QMK-based firmware. Some are ready-made, but most are not. It’s worth a look if there’s a suitable keyboard when you feel like switching to Colemak. Windows, Mac, and Linux support Colemak natively. So if you skip the Tarmak layout steps you can switch the keyboard settings in Windows. But it will be a lot harder.
Not all software works with the Tarmak layout
As a frequent Vim user, I can tell you that the Tarmak layout isn’t supported without significant remapping. I tried it and failed miserably. This got me thinking that there will be other things that won’t work out of the box. However, I haven’t had any problems with other applications. But consider yourself warned.
Please don't do it for speed
The final tip that I have to tell you is the most important one. Please don’t do it for speed. Switch for comfort. The first hours are no fun. You’ll want to go back to Qwerty pretty quickly.
After typing a blog post and finishing a PowerPoint, I started to understand the value of using the Tarmak and Colemak layouts.
Summary
In this post, we discussed switching from Qwerty to Colemak in 5 steps using the Tarmak transitional layout. It is a weirdly exciting weekend project. So, if you’re up for it, give it a shot.
Be aware, though, that it’s pretty hard to switch keyboard layouts and only recommended if you’re willing to accept a slow typing speed for a while and you have a mechanical keyboard that lets you program the Tarmak layout.
Hope you enjoyed the read!